In this blog, you will learn how to automatic insert timestamps in Google Sheets with Google Apps Script. This is particularly useful when you want to track changes or updates to specific cells in your spreadsheet without manual intervention. Our goal is to automatically insert a timestamps in a specified column whenever a particular condition is met in another column. For example, you might want to log the exact time a status in column C edited or changes by automatic updating column D with the timestamps. Below is an example when tasks done (checkbox tick) in C column then automatically insert timestamps in D column.

Open Google Sheets and Set Up Your Data
Start by opening New Google Sheet and make data in sheet by following:
- Make Headers from B Column to D column. Tasks, Status and Completion Date & Time.
- In Column B add tasks list.
- In C Column select Range for example C3:C12 then go to Insert menu bar in top of Sheet. Then Click on checkbox option. This is only for learning purpose but you can also dropdown list for Yes/No, Pending/Done or as per your requirements.
- in D column Leave blank for inserting Timestamps when C column changes.
Setting Up the Script to Automatic insert Timestamps in Google Sheets
Here’s a step-by-step guide to creating a script that does just that:
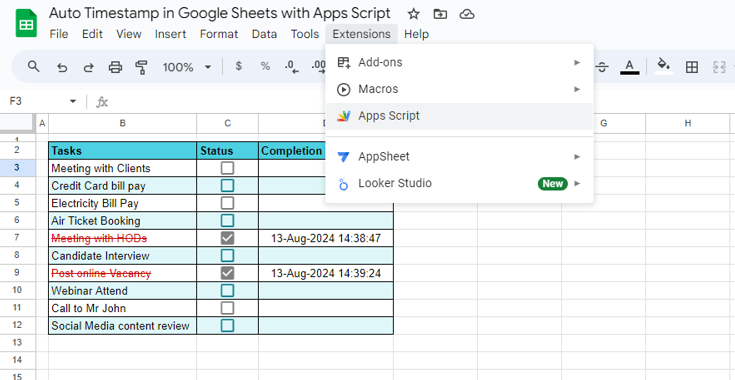
- Access the Script Editor: Click on Extensions in the menu bar top of the Google Sheet, then select Apps Script as shown in below image. This will open the Google Apps Script editor in new window.

- Name to Project: Give name to the project by clicking on “Untitled project” for example “Auto TimeStamps”.
- Write the Script: Copy and paste the following code into the script editor:
- Save and Authorize: Click on the floppy disk icon or press Keyboard Shortcut Cltr + S then Click on Run button. First time authorize the script to access your Google Sheet. You’ll need to grant permission for the script to interact with your spreadsheet.
- Test the Script: Go back to your Google Sheet and make an edit in column C (click on Checkboxes) that matches the required value (“TRUE” in this case). If everything is set up correctly, you should see the current date and time (timestamp) appear in column D of the same row.
Customization Tips for Automatic insert Timestamps in Google Sheets
- Change the Sheet Name: Modify the sheetName variable to match the name of your sheet in this example script “Sheet1“.
- Adjust Column Numbers: Update columNumber and timeStampCol if your monitored or timestamps columns are different. In this script used 3 and 4 columns respectively.
- Modify the Trigger Value: If you want to use a different trigger value instead of “TRUE”, change the requiredValue variable accordingly. For example: Yes, Done, Completed, Received etc.
Conclusion
By using this script, you can automate the process of logging timestamps in your Google Sheets, which can be incredibly helpful for tracking changes and managing data more efficiently. Google Apps Script offers a flexible way to customize your spreadsheets, so feel free to experiment with different conditions and actions to suit your needs.
Thank you.
You can get Google Sheet’s file to get Script file by clicking below button.